
Affiliate Disclosure: When you click links at Only Greats & make a purchase, we may earn a commission. As a free site, we join affiliates like eBay & Amazon to help offset our costs. THANK YOU for your support!

Last Updated On: September 29th, 2023
Imagine you’re hanging a piece of art right above the sofa.
Most people understand what to do: align the piece of art so it sits level without leaning crooked to one side, centered with equal space to the left and right of the couch. Easy-peasy, right?
We inherently learn the principles of alignment through experience and everyday examples around us, including wall art, the TV on the media stand, or how Only Greats is plastered at the top of this site.
Well, it works the same way with your favorite sports cards. Collectors (and graders) want to see close-to-perfect 50/50 centering between the border of the card, and the player pictured. That includes top, bottom, left, and right borders. It may also include alignment of the player name, or team name, and other intricate details we’ll get into later.
Sports card centering tools are designed to quickly assess the centering of a card — particularly best with edge and border alignment — with pin-point accuracy. In this post, you’ll learn what types of tools are available in the market, how to use them, what they cost, and how to leverage what you learn to nail centering grades with top-tier grading companies.
So get your sports card protractor ready and let’s dive in!
Note: if you’re already a pro at centering and understand its importance on card values, skip the basics and jump right to the tools section, or choose from the table of contents below.
Table of Contents
How Important is Centering?
Centering is one of four primary categories that influence a card’s condition (or quality) and grade designated by grading companies. Of course, the other three are: corners, edges, and surface.
We won’t dive into how each professional grading company will factor centering into the final grade assigned to a card, although PSA’s grading scale is a great example of how lenient each grade level can be on centering (including on the front and back of the card).
While any serious damage to a card (e.g. creases, tears, etc.) can drastically impact a card’s desirability, centering can be a big drag on the overall eye appeal, and therefore dampens interest from prospective buyers or collectors. Especially for older, vintage cards like the ones often featured in our high eye appeal football and baseball card eBay lists.
But what exactly is eye appeal? According to PWCC, eye appeal can be explained as:
Uncommon, exceptional visual elements of vintage issues – be it precision centering, crisp colors, or above-average registration – can help elevate assets into the upper echelon of their technical grade.
To explain in pictures, imagine you have the choice between either of the two cards below. Which one is better balanced? Centered? (forget the scan quality for a second, as we’re just talking about centering here)
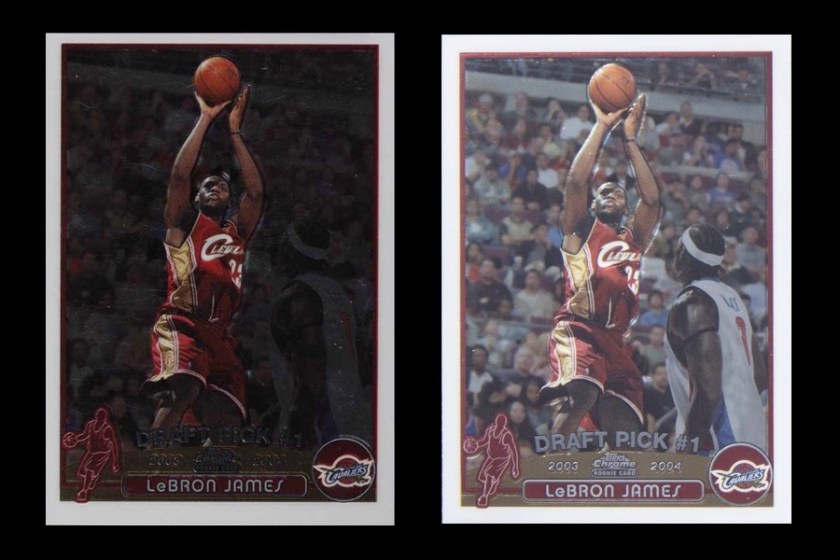
If you chose the copy on the right, you chose a BGS 10 Pristine graded card, with a 10 Pristine subgrade. It clearly has better eye-appeal when it comes to centering.
On the other hand, the copy on the left is actually a Mint PSA 9 (OC) grade. The OC qualifier is PSA’s way of designating the card as “Off-Center“, which would have been a Mint card otherwise. If you had purchased the cards raw with the intent to grade them, the difference in price between the two — if all else is exactly the same — is sizable.
Centering Impacts Sales Prices
How drastic is the price difference between the two LeBrons discussed? A BGS 10 Pristine rookie last sold for over $8,000, while a PSA 9 (OC) went for 1/10th of the price — we’re talking under $800. Now this is obviously an unfair comparison given we’re taking a stellar example and comparing it with a card that could have been arguably left in raw condition (ungraded).
A true PSA 9 LeBron sells for about $1,300 according to CardLadder. This is still a wide disparity in value when compared to a PSA 9 (OC), almost 3 to 2. The point: if you’re looking to buy raw cards that have the potential to grade high, avoid the card with lopsided centering.
How are Vintage Cards Impacted?
Is quality centering (and by extension eye appeal) reflected in prices of vintage cards as PWCC asserts? Let’s have a look.
1952 Topps Mickey Mantle #311 Card
The two Mickey Mantles below received the same technical grade of 4 from PSA, representing VG – EX condition. But the similarities stop there, as their prices in the open market are nothing alike.

The one on the left sold for $81,000 at Robert Edward Auctions (REA) in December, 2022.
One month later, the one on the right sold for over 50% more at $122,400 via Goldin Auctions in January, 2023.
The Mantle on the left is off-center with a considerably large left border. Even with much sharper corners and great color, it did over $40,000 worse than its counterpart on the right. While the price difference could be attributed to other factors (e.g. Type 2 tends to beat Type 1 in price, or trying to line up two deep-pocketed buyers ready to spend 100k on a Mantle card before Christmas), it’s hard to explain away a $40,000 swing in its entirety.
With Goldin Auctions peaking right now thanks to huge exposure through their hit show on Netflix, we made sure the release of the show in April, 2023 occurred well after the auction results. Even though REA is no slouch, more eyeballs could have resulted in a higher sale from Goldin, hence why we double checked.
PWCC Eye Appeal Examples
According to the examples shared by PWCC, the PWCC-S “Superior” assessment (given to the Top 5% of examined copies) of the Joe Montana PSA 9 Mint rookie yielded a 3x higher price than a traditional PSA 9.
In the PWCC-E “Exceptional” examples (Top 15%), the Montana PSA 9 sold at 2x higher in price, while the Ernie Banks PSA 7 rookie did 40% better than a traditional PSA 7 graded card.

Lastly, the PWCC-A assessment, for “Above Average” (Top 30%), achieved a price that is 18% higher for the Larry Bird/Magic Johnson rookie card.
In all the examples discussed, PWCC has already done the hard work of assessing eye appeal and slapped a sticker on each slab to inform both buyers and sellers of the stellar example up for auction. This obviously generates more demand as they’ve judged the merits of each card across key categories including centering, corners, surface, edges, and simply the overall look (aka appeal, which can be subjective by nature).
Since most of our cards are not going through PWCC’s doors for assessment, we can use a specific type of sports card grading tool to judge the centering — to the decimal point — right from home.
Sports Card Centering Tools
If you’ve ever tried to review a card across all four categories, it can be hard to spot the imperfections like a true grading expert could. They have multiple sports card grading tools at their disposal, for example magnification and measurement devices, bright lighting, and other technology to assess a card’s condition when it arrives on their desk.
A measurement tool, like a ruler, is precisely what a card centering tool actually is. It’s a minimalistic (and affordable) way to self-evaluate the centering of cards without guessing.

There are a few key players selling sports card centering tools in the market. Let’s discuss some of the popular ones.
GradeMaster
The GradeMaster card centering tool is one of the OGs in the market, selling laminated sports card protractors since 2015. According to their eBay listing, they’ve sold over 19,000 of these nifty things. At $6.59 for one piece, it’s the cheapest price we could find when purchasing our very own.
The GradeMaster is shipped first class via eBay, and arrives in a small resealable bag containing the card centering tool, centering percentages table, and instructions. All three items are laminated for extra durability from wear and tear which is a nice touch for such an affordable purchase.

Gem Mint Tools
Similar to GradeMaster, the Gem Mint Tools (GMT) branded sports card centering tool has been around for a few years, and sells like hotcakes with over 17,000 orders on eBay alone.
At the exact same price of $6.59 for one tool, it appears both sellers are keen to compete on price. That said, GMT offers a better rate on eBay if you buy two or more.
The GMT tool arrives inside a resealable bag as well, via bubble mailer. The bag contains a laminated centering tool, and a thick paper stock card with instructions on one side, and the centering percentages table on the other side. The instruction card is not laminated, but feels thick enough to survive heavy usage.
GMT also includes a piece of felt, which is probably intended to help clean fingerprints from the tool as it is used over time, and a few ‘raw grade score card’ stickers to track your results.

Using Card Centering Tools: Step by Step
It’s time to roll up the sleeves and analyze the centering of a couple sports cards.
As both tools are very similar in design and function, we’ll use the GradeMaster in our tutorial. Also, given that card designs can come with and without borders, and differing placement for player names and team logos, we’ll look at several different types.

To start, these are the instructions for using the card centering tool.
Centering Tool Directions (GradeMaster)
Pay close attention to GradeMaster’s recommendation to measure “…for worst centering…” first, as this will determine whether the card is worth grading or not right off the bat. It’s a smart approach since we’ll save time if the first thing we measure is 70-30 centering that’s a wrap (i.e. the card will sit in a toploader for life).
1) DECIDE WHICH PART OF CARD TO MEASURE FOR WORST CENTERING (TOP-BOTTOM, OR LEFT-RIGHT)
2) IF ONE OR THE OTHER ISN’T OBVIOUS, MEASURE BOTH AND USE THE WORST ONE OF THE TWO
3) CENTER STANDARD SIZED CARD AS CLOSELY AS POSSIBLE UNDER TOOL “WINDOW”
4) READ LINE NUMBERS ON EITHER SIDE OF THE CARD (IF NOT EXACTLY LINED UP ON ONE OR BOTH SIDES YOU MUST EXTRAPOLATE OR AVERAGE BETWEEN THE CENTERING PERCENTAGES)
5) REFERENCE NUMBERS ON THE TABLE PROVIDED TO GET APPROXIMATE CENTERING
EXAMPLE: LEFT AND RIGHT EDGES OF THE PRINTED IMAGE ON THE CARD LINES UP MOST CLOSELY UNDER LINES 3 AND 2. TABLE LINE FOR 3-2 IS APPROXIMATED TO 60/40 PERCENT CENTERING FROM LEFT TO RIGHT6) DECIDE IF YOU WANT TO SEND YOUR CARDS TO THE TPG FOR GRADING OR NOT
Centering Percentages Reference Table
Now that we understand the instructions, this is our handy centering percentages table which we’ll reference throughout the post as we measure cards with and without borders.

Cards With Borders
Let’s start by measuring an easy card that has clear borders in its design all the way around.
Mike Trout Gold Prizm

Per GradeMaster’s recommendation to narrow in on the worst centering of the card, the good news is it’s not obvious. It appears the centering is fairly proportionate so we will measure both Top-Bottom (T-B), and Left-Right (L-R) centering.
We first align the GradeMaster tool on top of the Trout card using the dark black borders shown on the tool like this:

Next, let’s look closely at where the card’s borders align relative to the lines drawn on the tool.
The left border aligns right on the number “3” (solid lines = odd numbers) where the arrow is pointing:

On the opposite side of the card, the right border falls in between the number “2” and “3”, so we’ll call it “2.5.”

Perfect centering would have been a 3 for the left border, and a 3 for the right which would result in “50/50” centering (basically dead even). Or both sides could have just as easily been 2.5’s for the same 50/50 centering result.
With 3 for the left border, and 2.5 for the right border, unfortunately there is no direct hit when referencing the centering percentages table card. It falls between 3 -2 and 3 -3. This means, the centering is in between 50/50 and 60/40, which is quite good.
We can still determine the precise centering with simple math if we wish:
Given both borders combined equal 5.5 (3 + 2.5), we can take the left border number 3 divided by the total of 5.5 for a centering of approximately 55% for the left border (3 divided by 5.5 is 0.5454…). With the left border at 55% centering, the right border is therefore 45% for a total of 100%. This is unsurprising since the right border number of 2.5 divided by the 5.5 total gets us approximately 45% mathmateically (2.5 divided by 5.5 is 0.4545…).
Since the Mike Trout card has solid L-R centering, let’s move forward to determine the Top-Bottom centering next.
The top border aligns near the number “3” on the card centering tool.

The bottom border scores exactly “3” on the tool as shown:

The Top-Bottom centering is also great. Even though it’s not perfect, we know slightly less than “3” for the top and exactly “3” on the bottom border is even better than 55/45 centering since we just finished calculating the math for 3 and 2.5 above. Sweet!
This card passes the centering test and can go to grading assuming other aspects of the card check out. We will not review the back of the card, as it’s tomayto, tomahto.
Next up: Clayton Kershaw Silver Prizm

The Kershaw card has an all-around border in the 2012 Prizm design, which looks pretty simple to measure at first glance. But if you look at the top right area, the players logo overlapping the portrait’s frame makes it less obvious where we should measure from. In fact, not knowing where to line things up is a common occurrence as you rifle through cards with vastly different designs (more about this later).
Now that we’re warmed up, let’s jump right to brass tacks and talk numbers.
We decided to measure from the top of the players logo for the top border, and aligned with the number “3”. Since we also have the right border in focus below, we can see it is also matched with the number “3” on the centering tool:

Meanwhile, the bottom border measured from the lower edge of the “Prizm” emblem nailed “3” on the card centering tool as well. Since both the players logo at the top and the Prizm emblem on the bottom matched up, we felt confident this card was designed as so.

Moving to the final left border, the tool aligned at the number “3” as well. All 3’s, all around!!

What we have here is about as good as it gets: 50/50 centering. If our hunch is right, and the design is measured from the areas we mentioned, then this Kershaw card should score well for centering.
Pro tip: when it’s unclear how to measure a card based on its unique design, and how grading companies interpret the centering by extension, we recommend reviewing similar cards at marketplaces like eBay or MySlabs to see how they graded. In the case of the Kershaw, we could search our marketplace of choice for “2012 prizm <<player name>> PSA 10” (or PSA 9, or BGS 9.5 and look at the centering subgrade), and review how those cards look compared to our own card.
Cards Without True Borders
If you’re paying attention, the cards we’re reviewing are getting progressively more complicated. The following Steve Francis has no borders, and is also die-cut to boot.
Steve Francis Ultra Platinum Medallion Die-Cut

Cards without a border will need to be reviewed from other (important) elements of the design instead. In the case of the Francis, we can see the player’s name is designed such that it sits on a red base with left, right, and bottom points of reference.
We’re going to measure how much room we have between the left and right edges on both sides of the red base for starters. The left of the base is just short of the number “9” using our card measuring tool:

On the other hand, the right side of the base is precisely at the number “8”.

By reviewing the centering percentages table as we did earlier, we can see a 9-8 ratio is 53% / 47% centering. Since our left measurement is slightly less than a “9”, it’s even better. The math says if this is more like 8.75-8 ratio (8.75 divided by 16.75 total equals 0.5223), then we can conclude the L-R centering is about 52% / 48%. Nice!
Let’s hope the T-B centering is just as good.
By reviewing the image above, we can see the bottom point of the red base is about “4.5” on the sports card measuring tool.
Conversely, the top of the card only has the tip of the Fleer crown as a reference point we can use to determine the centering. The tool shows us the crown falls between the number “3” and the number “4”; let’s call it 3.5.
With a 3.5 top, and 4.5 bottom, we do not have a match on the centering table again. So let’s do the math: 3.5 divided by a total of 8 equals 0.4375. Conservatively speaking, let’s round down from 43.75% to 43% just to be safe. This means if the top of the card is 43%, the bottom of the card must measure 57% for a total of 100%.
That’s actually not bad! If we intended to grade this card with PSA, we know even their Gem Mint grade allows for some leniency:
GEM-MT 10 (Gem Mint)
…
The image must be centered on the card within a tolerance not to exceed 55/45 to 60/40 percent on the front and 75/25 percent on the reverse.
The Francis card (just like the Kershaw earlier) posed some minor challenges for us in determining what points of reference to use when measuring funky designs. As mentioned previously, we could venture out to eBay to see how other 2004 Ultra basketball cards grade for a better clue if we remain unsure.
Which leads us to some of the challenges commonly faced when using sports card centering tools.
Common Challenges and Tips
As experience has shown, we faced several hiccups using centering tools, however we learned how to adjust our approach with the following tips:
- Aligning the tool with the card looks easier than it is: we found ourselves measuring twice to ensure accurate readings multiple times. As more experience is gained, falling between 60/40 and 55/45 or better is “close enough”, and obsessing over perfect readings became less necessary.
- Difficulty understanding what grading companies look for: when measuring cards with complex designs (e.g. the Kershaw with additional elements around the border, or cards with no border at all, or die-cut cards), thinking like a grader can be challenging to say the least. Using common sense and reviewing other graded cards of the same brand helps build confidence over time.
- Centering percentages table does not account for in-between readings: it’s common for cards to align in between the grid-line numbers when measured, which can lead to annoying math to get accurate percentages. That said, the first bullet above — related to experience — teaches us that obsessing over the literal centering is usually not required (unless you find yourself right at the cut-off point of 60/40 vs. 61/39 centering and fall out of gemming with PSA, for example)
An additional (and obvious) problem with in-hand centering tools is that they cannot help judge centering for cards being viewed digitally online (not in hand). This is where mobile apps can hopefully fill the void.
Sports Card Centering Apps (Mobile)
Sports card centering apps aim to digitize the ability to measure a card’s centering with the snap (or upload) of a picture, and replace the need for laminated ruler tools.
And nowadays, it’s not surprising for consumers to seek a digital tool over a tangible device. An app is readily available on your phone wherever you go, and can be downloaded or accessed in an instant.
But, are apps just as good at precisely determining centering?
The answer is resoundingly no.
Our intent was to highlight the top apps in the market, from downloadable mobile apps for your iPhone or Android, and also online tools where you can upload a picture of your card and have it calculate a centering grade. We’re going to save you the headache and say they’re a hard pass. They’re really inconsistent, super particular about how to take pictures, and just aren’t worth the time. Yer-welcome!
Hopefully a company with the technical chops to solve this challenge emerges in the near future. Maybe it’s you?
Final Verdict
The importance of centering cannot be understated in the trading card hobby. While many aspects of a card’s condition go beyond centering, adding a sports card centering tool to the tool belt is an extremely affordable way to ensure one of the four key categories that impact card grades is accounted for. And even if you’re not planning to grade a given card, you need to be choosy when buying cards to ensure they’re well-centered (remember the resale value will be much stronger).
Whether you choose the GradeMaster or GMT toolkit, either will be a fine choice. Both do the job they’re intended to do, although much of the results yielded will depend on your ability to align cards under the tool, do some simple math, and determine what grading companies want to see based on the card design. For less than $7/ea. (shipped), do yourself a favor and buy a tool or two and master card centering before grading your cards.